Saturday, October 19, 2013

So that's where the metal came from...

Here was the first look at the offending tappets and lobe.  Tim sent these photos over as he was disassembling the case.  We found exactly what we thought had happened in the place that was most likely (one cam lobe sharing two tappets).  You can get a better sense of how this design has challenges because the cam sits at the top of the crankcase and the oil is in the bottom.  The cam and tappets are mainly lubricated by splashing oil from the crankshaft which is the structure at the bottom of the picture.  Also, when the engine is shutdown, the heated gases within the crankcase are hot and because heat rises, any moisture (which is a lot) goes with it.  As the air cools, the moisture condenses on the cam and tappets setting up the scenario for corrosion.  One technique I have used in the past is to pull the oil dipstick up as I am putting the plane in the hangar.  It is telling how much steam escapes from that hot engine.  Using an oil and or oil additives that keeps a film on those metal surfaces is one of the keys to keeping the corrosion and subsequent wear down.


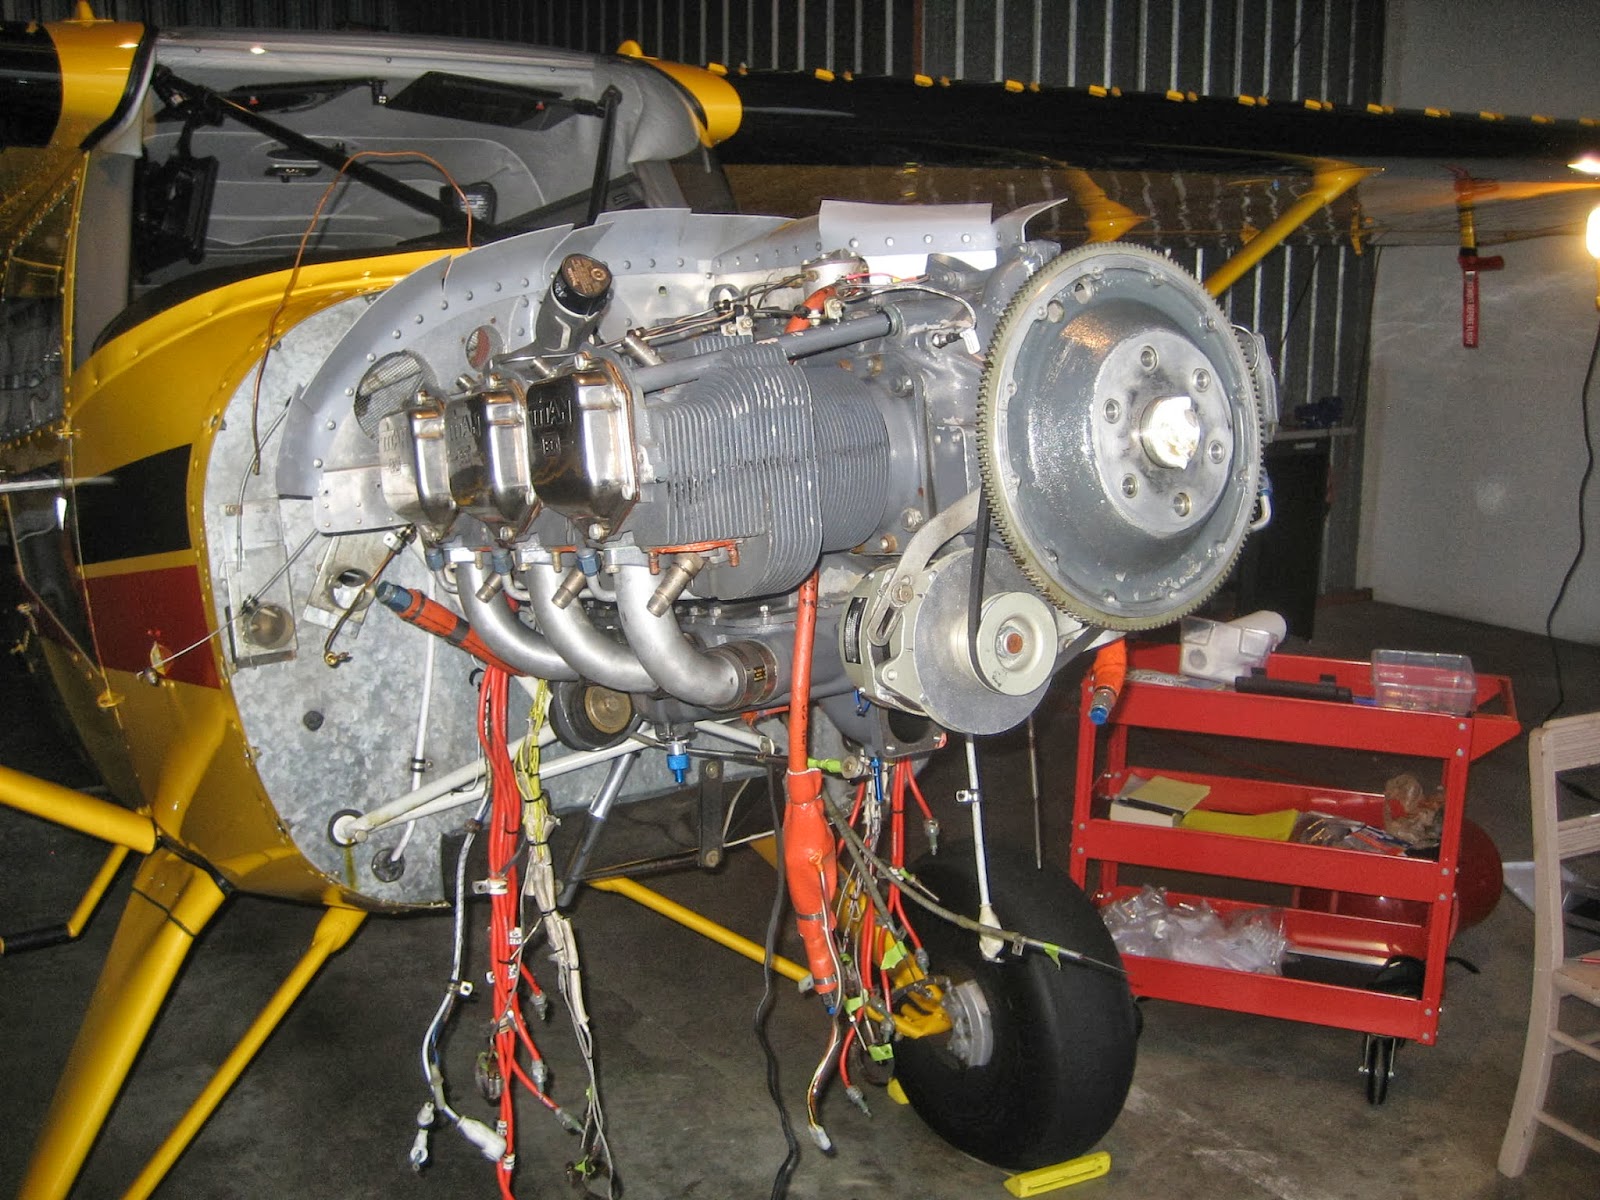
Most of the life of this engine has been using Aeroshell 15W-50 aviation oil.  For the last two years, I switched to Phillips 20W-50 and added Camguard.  For the life of this particular cam shaft and tappets (which were replaced at about 1100 hours with reconditioned parts), that was about 700 hours of which a little over 300 hours was with the Phillips/Camguard combination. I have been doing some reading and getting opinions from many experienced pilots and mechanics and have had a very wide range of what is considered to be the optimal choice.  At this point I haven't decided which route to go, but I do have a good idea of the protocol to follow for the engine break in from Lycoming and Tim's experience.  The consistent point of agreement about reducing corrosion in an airplane engine was to fly it as much as possible and for at least 45 minutes to an hour minimum time on each flight.  

An idea I had was to devise a way to decrease the amount of moisture inside of the crankcase when the engine was not running.  I keep the plane in an unheated metal hangar at Paine Field (KPAE) and especially during our moist and long winters the relative humidity inside of the hangar is often high enough to have condensation on the walls and concrete floor.  After searching the internet I found a couple of ideas about building an air dehydrator.  The idea was to circulate dry air through the case while the plane was not being flown. 

I did some more research and found that there are a variety of desiccants that would work for this application.  The most readily available was Silca gel which I found at a local crafts store where it was used to dry flowers.  Silica gel (http://en.wikipedia.org/wiki/Silica_gelis a granularvitreousporous form of silicon dioxide made synthetically from sodium silicate. 

Silica gel has many properties that make it a good desiccant.

- It will adsorb up to 40% of its own weight in water vapour. This adsorption efficiency is
approximately 35% greater that typical desiccant clays, making silica gel the preferred choice where
weight or efficiency are important factors.
- It has an almost indefinite shelf life if stored in airtight conditions.
- It can be regenerated and reused if required. Gently heating silica gel will drive off the adsorbed
moisture and leave it ready for reuse. 250 degrees F for 2-3 hours.
- It is a very inert material, it will not normally attack or corrode other materials and with the
exception of strong alkalis and hydrofluoric acid is itself resistant to attack.
- It is non-flammable.
- It is most frequently and conveniently used packed in a breathable sachet or bag. These are
available in a wide range of sizes suitable for use with a wide range of applications.

Another material that can reduce the relative humidity even lower is called molecular sieve. 
Molecular sieves are desiccants with differing properties to those of silica gel. With the appearance of small opaque pinkish beads, molecular sieves are synthetically produced, highly porous crystalline metal-aluminosilicates. They have many internal cavities that are linked by window openings of precise diameters. It is these diameters (measured in Ångstroms) that classify molecular sieves - 3Å, 4Å, 5Å, and 10Å (also known as 13X). Adsorption occurs only of molecules with smaller diameters than these cavity openings. Larger molecules will be excluded from adsorption. Preferentially adsorbed are molecules of greater polarity. 
This makes molecular sieves ideal for adsorption of water from air and liquids, as water molecules are both polar and very small. Molecular sieves will adsorb water molecules and other contaminants from liquids and gases down to very low levels - often just 1 part per million.

Molecular sieves properties as desiccants differ from silica gel in a number of ways :
(1) They adsorb water vapour more rapidly than silica gel.
(2) They will reduce water vapour to much lower levels  than silica gel, making their use essential 
when a very dry product or atmosphere is required. 
(3) They perform more effectively as moisture adsorbers at higher temperatures (greater than 25°C) than silica gel does.

The goal in the end is to get the relative humidity inside of the crankcase under 40% where the corrosion process greatly reduces.

I have built a prototype dryer using some sealed plastic container, an aquarium pump, vinyl tubing and rubber stoppers.


The concept is to dry the air and circulate it through the crankcase.  The plastic vinyl container is sealed with a gasket under the lid containing the silca gel on the inside with the aquarium pump.  The pump will move 7 liters of air per minute.  I used two plastic food storage containers to hold the silca gel (about 4 lbs) in two separate compartments with multiple holes drilled through them to allow for increased air circulation.


I bought an inexpensive digital hygrometer from Home Depot to monitor the effectiveness of the set-up.


After running the pump for 15 minutes and having the system closed, the relative humidity dropped from 78% to 20%.  When I went back to the hangar a week later it had dropped to 16%.


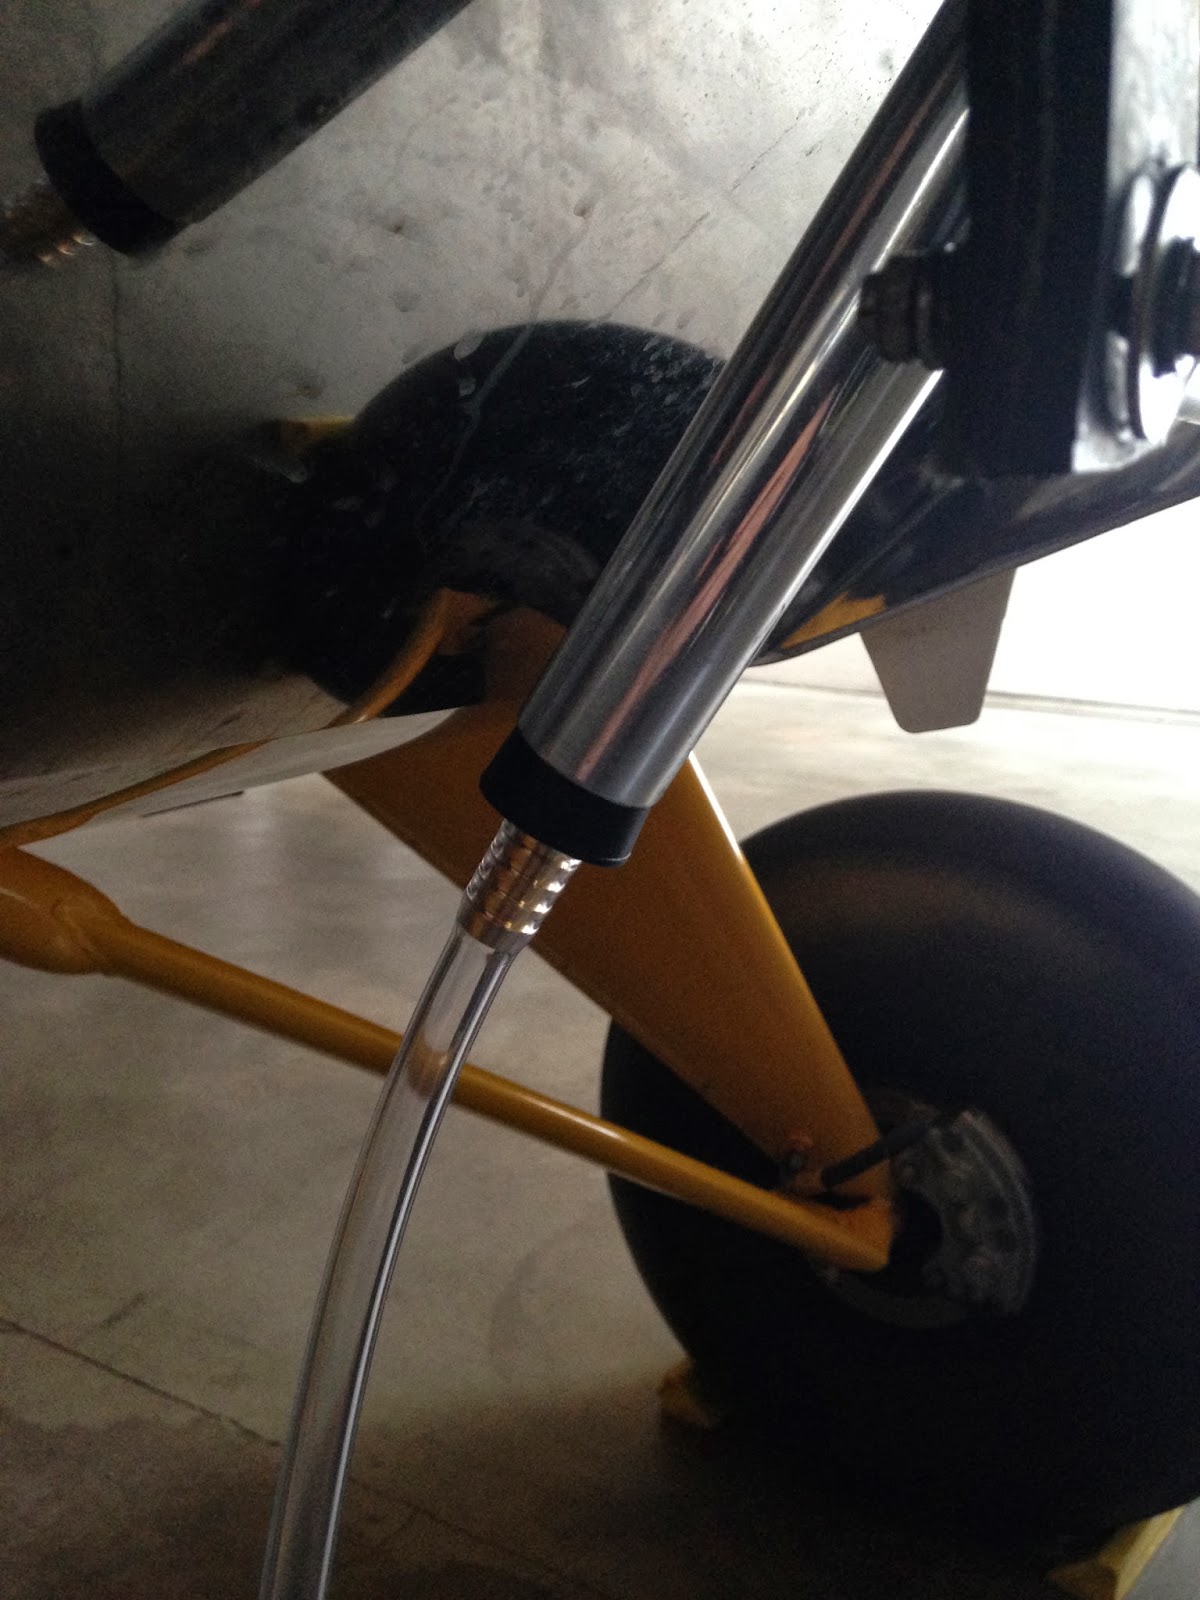
The idea is to circulate the air through the oil breather tube and the exhaust pipes and draw air back out through the oil fill tube.


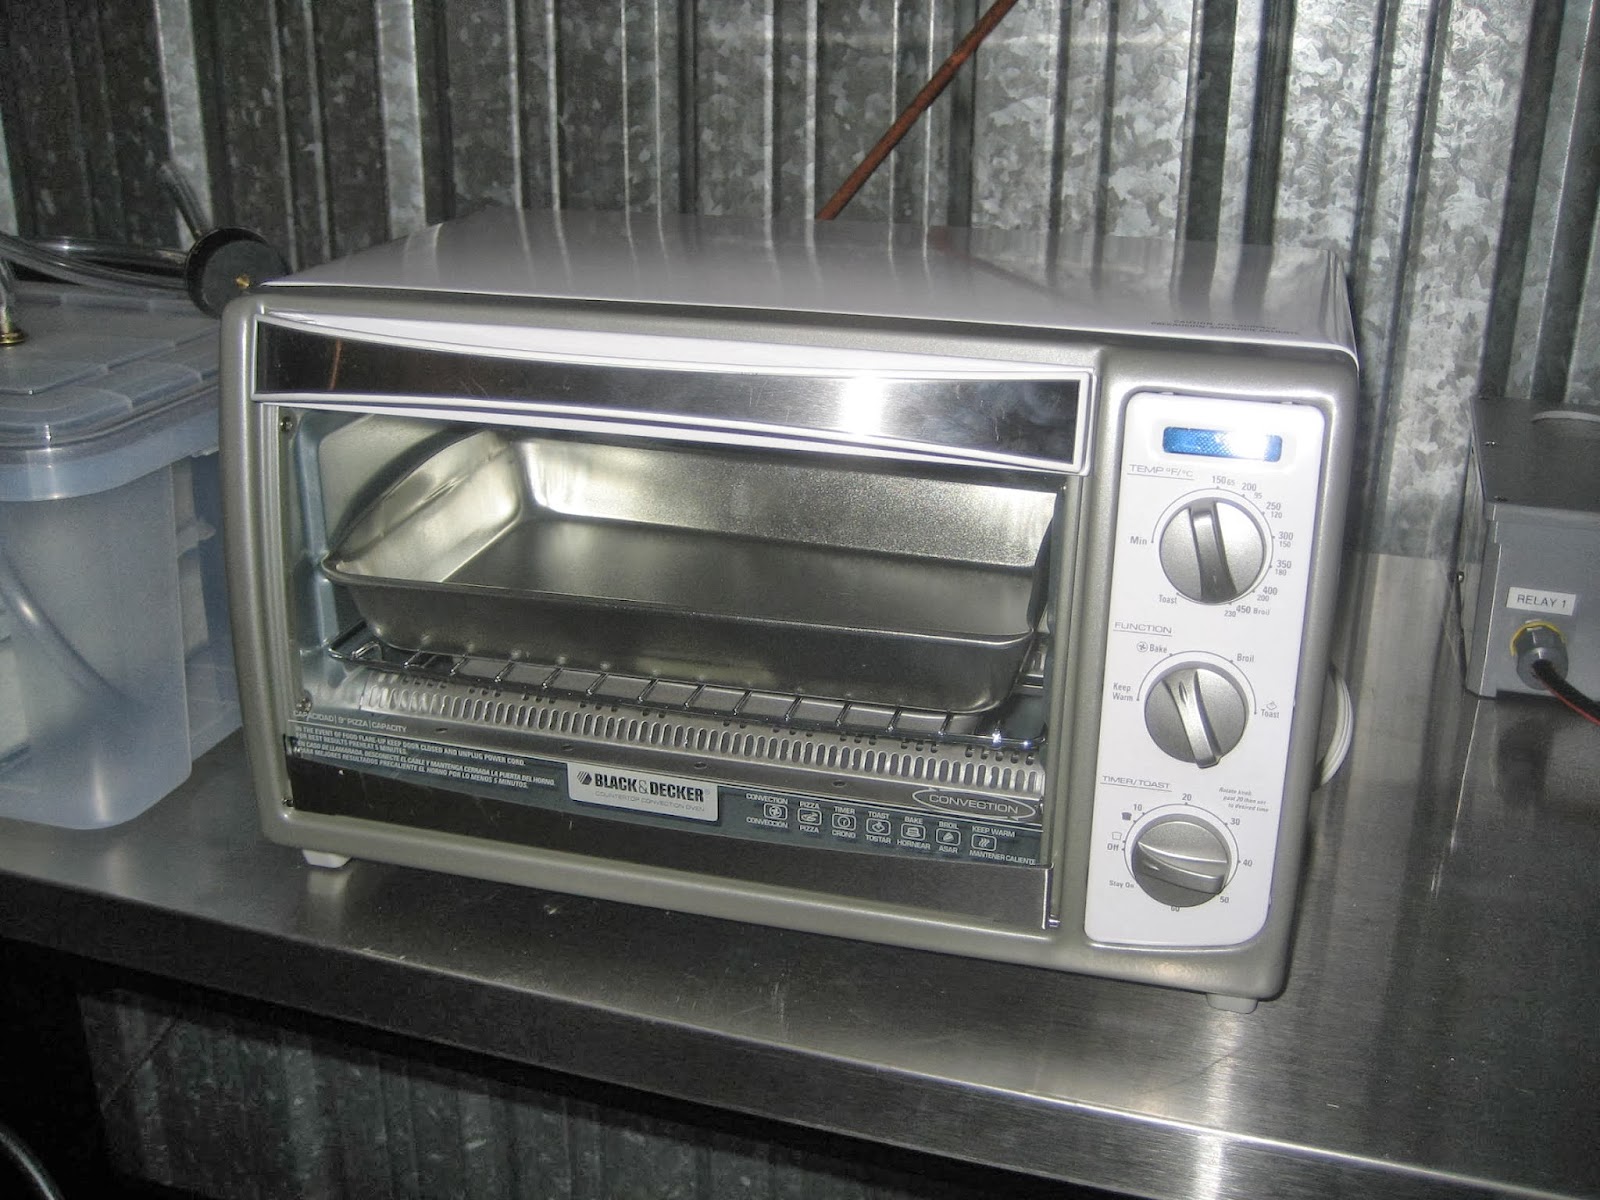
A final part to the system is a toaster oven to heat the silica gel once it adsorbs the water and recharge for further use.  I am anxious to give this a try, seems like it should work.  Just need to get the engine parts back to start reassembly first.

Monday, October 14, 2013

Taking care of the business end, the propeller

With Tim off with the engine I set out to find a shop that could overhaul the propeller.  It just made sense to do this whole thing as completely as possible and the propeller hadn't been overhauled in a while.  There was some definite leading edge pitting from the IMC flying especially when you are in the clouds and in the rain.  I called two prop shops and it's interesting how I, as a consumer, made immediate decisions about the shops by how I was greeted and talked to on the phone.  The first place required a bit of probing to get the information and wasn't all that detailed on how things would get done or how long it would take.  When I asked the price he said it's about $3,000 but it could be more and they didn't do governors (this is basically an oil actuated valve that twists the propeller blades).  When I asked how much the governor would cost he said he wasn't sure but I could call another place they would recommend to find out. When I called the second prop shop, AC Propeller, (http://www.acpropeller.com) it was a different story.  I ended up talking with Mike Worden, the owner and he was very specific on the details and they did do governors.  The price was $2400 for the prop and $900 for the governor.  He also asked me when I needed it by and said he would try to accommodate whatever I wanted. I really liked the attitude and it ended up being an excellent choice.


Bead blasting the paint off all the parts before some precision measuring and balancing.  


If the parts met the specs then they were reused.


This is how I knew I picked a good shop.  Look at the pattern of the grinding, that's attention to detail.


Polyurethane paint in a traditional McCauley pattern.


Final product ready for pick-up.


Back at the hangar waiting for the rest of the engine.


I took the spinner and repolished it with NuShine products just as I had done a couple of years ago.


The most efficient polishing occurred with just the right amount of polish, patience and a lot of elbow grease.


After 4 hours, not even a fingerprint.  Surprisingly this finish seemed to hold up pretty well for two years after I polished it the first time.

Sunday, October 13, 2013

Out the engine comes

It's always amazing to me how fast things come apart but how slow they go back together.  Because the plane was going to be down for 2-3 months and it would have to sit outside if it was at Tim's shop, we decided to pull the engine at the hangar at Paine.  The rainy season would be starting soon so I was glad to have the plane at home.  I would do the initial disassembly and Tim was later coming over with his truck and a winch to do the final removal.

The annual was due by the end of August, so at the finish of the overhaul we'll complete the annual inspection which will likely put the recurrent date into November.

The cam locks make removing the cowling much easier than before.

It didn't look like a sick engine.

I have found that using this old wooden chair with a towel on top to protect the cowling is just enough assistance so I can get the bottom cowling off by myself with ease.

There was hardly a drip of oil anywhere.  The stain on the muffler was from the valve cover gasket sealant.

Disconnected the battery before starting the disassembly.

I took photos of everything when taking things apart so when the time came to reassemble we wouldn't have to reinvent the wheel.

The prototype oil temperature control box that eliminates the need for using duct tape in the winter when the oil can run too cold. 

I tried to keep things organized.

Marking different parts with numbers.

Coding which clips to their home.

Oil out.

There won't be too many parts left at the hangar.


Spark plug wires and JPI sensor probe leads.

Disconnected ready to be lifted off.

The propeller was headed to AC Propeller in Seattle and I would later take it down for an overhaul.

Just the right amount of tension to get the engine mount bolts loose and off.
Every time I look at these they always seem so small to connect all that power to the airframe, but it works.

Don't drop it now.

The engine loaded and secured to a wood pallet for the ride back to Tim's shop.

Something seems to be missing.

I had some flying to do before we pulled the engine

After I had found the magnetic metal filings in the oil filter I talked with Tim and we both agreed that the problem was either the cam shaft and one or more of the hydraulic tappet bodies.  There are 12 tappet bodies and 9 cam lobes on this engine (Lycoming IO 540 1WA5).  They are made of a ferrous metal that has a hardened (nitrided) surface.  Once the nitrided surface wears away, the softer metal underneath wears at an accelerated rate and comes off in large chunks (spalling). Camshaft wear will result in loss of engine performance due to loss of volumetric efficiency and changes in valve timing.  Cam lobe wear may be most pronounced were two tappet bodies share the same cam lobe (these are the intake valves).

Here is a link to an Airworthiness Bulletin issue by the Australian Government  Civil Aviation Safety Authority issued on November 23, 2012 that discusses this issue in both Lycoming and Continental engines: http://www.casa.gov.au/wcmswr/_assets/main/airworth/awb/85/014.pdf

The tappet bodies run against the camshaft lobes and through the rods cause the valves to open and close.  That controls the intake and exhaust of gases to and from the cylinders which through the pistons turn the crankshaft that rotates the propeller.


We decided the prudent thing to do was pull a couple of valve covers and to check the valve lift to see if any height difference could be detected which would indicate wear on the cam lobes.  Tim found some significant change on the intake valve on one cylinder.  That's not what I was hoping for, but that confirmed what we had expected. The engine has had a history of having a broken piston around 1100 hours, which was before I owned the plane.  At that time during that repair a reconditioned camshaft was placed (in retrospect that was a mistake and is exactly why we are starting with a new one this time).

With all of the available information Tim and I had a long and detailed discussion about the risks of continued flight. This kind of wear would not be a catastrophic failure but a slow degradation of performance.  We decided that given the stage of the process and recommendations from Lycoming, it was safe to fly the plane another 20 hours and I would change the oil again then cut the filter to look at any metal accumulation.  As PIC (pilot in command), this was no different than all of the judgement calls before any and every flight.  One other parameter I was to keep especially close eye on the CHT (cylinder head temperature) readings.  Particularly cylinders 3 and 4 as they share the lobe that appeared to be wearing faster than the rest.  This is why I was very happy to have put in a JPI engine analyzer when we did the rebuild two years ago.  If the wear was progressing, eventually I would start to see a decrease in temperature of those two cylinders as less air would be drawn on the intake cycle thereby enriching the mixture and decreasing the temperature.

As far as the flights until that oil change everything was uneventful.  In fact, the engine seemed to purr and the performance was as good as ever.  Kind of ironic but yet a little disconcerting realizing that ignorance is bliss.  If I hadn't been cutting the oil filter and checking for metal every time I would have never even had a suspicion of anything being awry, especially since the oil analyses were showing everything within normal limits.  For me, it again reinforced that flying safely is not to be taken lightly and requires full attention all of the time.  

As a sidebar, while flying those last 20 hours, I did have one occurrence that turned out with no consequences but could have had a bad outcome and it had to do with the other end of the airplane.  I was landing with a heavy load on Stuart Island where we are building a small cabin that we hope to spend a lot of our autumn years in.  When I landed, I heard a deep pop when the tail wheel settled to the grass and knew immediately that wasn't good.  I had directional control and came to a normal stop at the end of the airstrip.  As I turned off the runway I noticed that the plane did not seem to turn normally.  In retrospect, I should have gotten out of the plane as soon as I had stopped and never even attempted a turn until I ascertained what had caused the pop.  Luckily the turn caused no damage but could have once I realized what had happened.  One of the leafs in the tail spring had broken.

There appeared to be a corrosion pit in the center of the spring right where the failure occurred.  This was an Alaskan Bushwheel Maule Tail Spring that we had installed two years ago and there must have been a slight pit defect in the metal that was painted over because you could not see any evidence during preflight inspections.  After this incident however, I now crawl under and look at the area of this bend much more carefully.

Luckily the second leaf held and the tail wheel did not bend up into the rudder.

This occurred early on a Thursday morning and I called Tim and he was able to get a shipment of a new tail spring out from Alaskan Bushwheels to his shop that arrived the next day.  A little more luck had a friend by the name of Tom Watkins, who happened to be going out flying that Friday afternoon.   Tom flew into Vaughan Ranch airstrip where Tim's shop was located and flew the tail spring up to Stuart.  

The new tail spring arrived.
A few boards and a jack and 30 minutes...

Torqued and good as new by Friday night.
I went on to fly the plane until late August did another oil change and cut the filter looking for the signs that would decide what would happen next.


As I washed through the filter I could see the same amount of metal I had seen before but in a shorter amount of time, so Island Flyer was put in the hangar not to fly again until the overhaul of the engine was done.  Interestingly, the oil analysis from the prior oil change when the metal in the filter was first noticed, still showed everything within normal limits.


Saturday, October 12, 2013

Island Flyer has turned into a great, fun flying machine


Island Flyer flying over the islands
A little over two years ago we completely rebuilt our 1993 Maule M-7 235 stripping everything down to bare tubes and started from the ground up.  I worked with Tim Boughner of Tim's Aircraft Repair and Restoration in Port Orchard, Washington.  The combination of my drive for trying to improve everything we put our hands on and Tim's expansive skill and knowledge base, we created what I have come to realize was the near perfect aircraft. I documented the whole process on a previous blog that can be found here: http://www.islandflyeradventures.com/Island%20Flyer%20Blog/Site_2/Blog/Blog.html
Unfortunately through the lack of support for the original blog format and the magic of the internet not all of the links in the blog work, but most do.

The plane has been a joy and has worked flawlessly.

Pt. Roberts, Washington

Red's Wallowa Horse Ranch, Oregon

Arlington Fly-in, Washington

Moose Creek Airstrip, Idaho

Shearer Airstrip, Idaho


Sullivan Lake, Washington

Instrument meteorologic conditions

Panel at full power

San Juan Islands at sunset
Over Eastern Washington
When we did the rebuild we cleaned up the engine but did not break the case apart. We took off the cylinders and did some honing.  The valve springs were changed and new valve covers were put on because of some corrosion.  We changed the magnetos and put in a new wiring harness with spark plugs.  The engine had 1465 hours on it and all of the parameters like compression and oil burn were good.  Visual inspection of everything we could see appeared to be in good working order. During the last two years it has run reliably and had the oil changed every 30 hours.  I now have 1810 hours on it.

Early in the summer while changing the oil I noticed some ferrous metal showing up in the oil filter.


I had been doing an oil analysis every oil change since I have had the plane and the previous oil analysis had shown all measures within a normal range.  This was the first time I had found any quantity of metal in the filter.  That wasn't such good news.